|
| |
| Mirror manufacturers need to
have a dedicated "Test
Tunnel". This will be a
space set aside in the
factory which is long enough
to test mirrors and can be
maintained at a very even
temperature, while allowing
easy access to the
individual components of the
system under test. |
| |
| There must be no draughts or
significant air convection
as this implies there is a
temperature gradient in the
tunnel which will
affect the results. |
| |
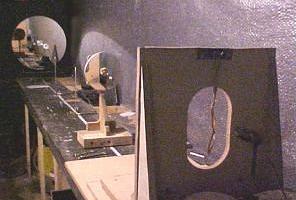
| In our new factory we have
several test tunnel
positions, - the one in the
photograph opposite is along
one of the walls. It is a
continuous timber bench,
waist high and about 24'
long. |
|
|
 |
|
|
| Concave Surfaces: |
There are several
satisfactory ways of testing
concave surfaces. We
generally use the methods
detailed below.
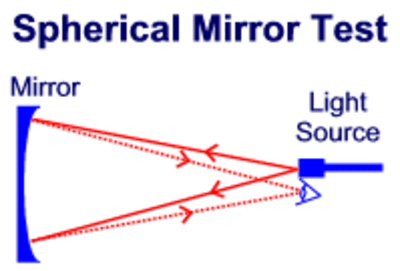
For spherical mirrors, one method is to set up a point light source at the centre of curvature of the mirror (twice the focal length) and observe the image formed. |
|
|
|
|
|
In practice the light source must be set up just off axis so the image is formed close to, but not coincident with the source so that it can be viewed accurately. The image is then viewed either with an eyepiece or on a knife edge and is interpreted to show defects in the mirror. |
|
|
For non-spherical mirrors, like the Parabolic, as used in a Newtonian Telescope, the light source can be abberated to correct for
the surface not
being spherical. |
|
|
For mirrors up to about 300mm diameter, this can be done very efficiently with a single Plano-convex lens placed close to the
light source.
The exact distance from the light source is measured as a result of the diameter, focal length and conic shape of the mirror under test. |
|
|
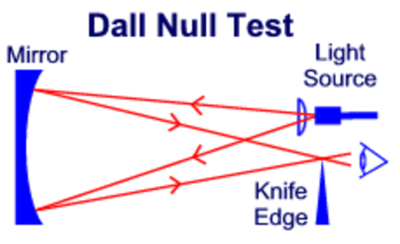
| A knife edge is placed close to the focus of the converging rays, and by small increments edged into the beam until the image
seen begins to darken. In a perfect mirror, the smallest movement of the knife edge at this point will make the image go
completely dark. In practice the dark area spreads over the mirror gradually as the knife edge is inclined. This test is known as
the Dall Null Test after the Englishman who invented it - Horace Dall. |
| |
The test is usually adequate for a final test for small mirrors up to 300mm Diameter and 1/4 Wave accuracy. It does become less accurate for larger mirrors and we use other tests to confirm accuracy
for these. |
| |
| If the knife edge is now moved forwards and backwards along the optical axis using a micrometer, individual readings of the micrometer can be taken as the shading spreads over the mirror. These can be used to calculate the RMS surface smoothness, - which for one of our normal specification mirrors will be less than 1/15λ. |
| |
For larger mirrors, we often use the Dall Null test as a preliminary test during the figuring as it is easy to
set up, but we follow on with either a Double Pass, which is described below, or we may resort to the James test, which is similar in principle to the Dall Null, but uses a large spherical mirror to abberate the light source. |
| |
| Regarding all main mirror testing, we generally use red light of 625nM wavelength as sources are now so readily available.
If we are providing a Certificate of Conformity, we usually convert the figures obtained at 625nM to equivalent values at Yellow light of 546nM. |
|
|
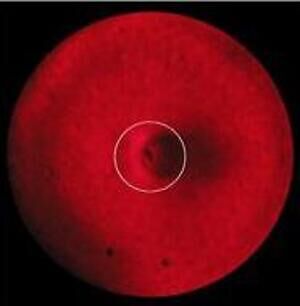 |
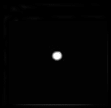
| Pictures taken of "real mirrors" will always show some shading unless the mirror is incredibly perfect. The picture here is the null of a 500mm mirror to our normal specification of PV 1/4λ Wavefront error. |
|
|
|
|
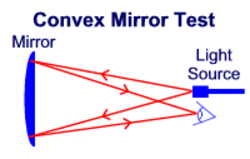
Convex Surfaces and the Ronchi Test: |
| The main use of Convex surfaces is a secundary mirrors in Cassegrain systems. Testing the Convex faces is more difficult than concave surfaces. |
|
|
For these mirrors we test by viewing the curved surface from the back, through the glass making up the mirror.
This makes the convex surface appear concave to the testing process.
|
|
|
For this test to work - the mirror must be made from a glass with good optical transmission characteristics.
BK7 is used for nearly all Cassegrain secondary mirrors. |
|
|
 |
|
 |
|
With a few tricks of the trade, this allows the normal methods for testing concave mirrors to apply. Following testing as an individual unit the mirror
is then paired up with a primary in a double pass test. |
| |
| Please note there are alternate ways of testing a convex mirror, - but they are all more complex. They are not as efficient and Oldham Optical does not believe they are as accurate. |
| |
| This method of testing through the back of the mirror does require it to be made from a glass with good optical transmission properties. |
|
|
|
| This rules out the use of Pyrex, Suprax and Zerodur etc, which can have differences in transmission characteristics across the diameter of the mirror sufficient to render the testing method unreliable. |
|
|
The use of a glass with a higher coefficient of thermal expansion is not a problem as the secondary mirror is always small compared to the primary mirror and in practice it will still
stabilise before the low expansion primary does. Overall the use of optical glass in the secondary allows a more efficient testing method to produce a better result at a cheaper price.
|
|
Elliptical Flats: |
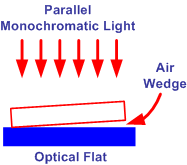
Elliptical Flats are required for Newtonian and similar telescopes and require an entirely different testing method. Instead of using a point light source,
a light source physically bigger
than that of the flat under test which produces diffuse parallel light is used. |
|
|
| The flat under test is placed on a known good optical flat. The pair are illuminated from vertically above and the result viewed from a near vertical angle. |
|
|
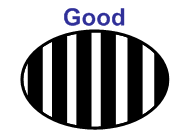
Due to the small air wedge that always occurs when two glass plates are placed together, a series of fringes will be seen. Basically a series of
straight regular fringes indicate the flat is good. Curved or irregular fringes indicate defects. |
|
|
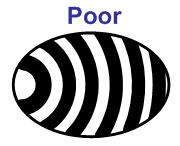
| Examples of what could be seen are illustrated below and an actual photograph of a flat being tested is displayed on the left. More detail on what quality of surface is needed on an elliptical flat to match a primary mirror is on another page of this website. |
|
|
|
|
Note: The fringes on this flat appear curved which would suggest the flat is "Poor". The picture was taken at a large angle to the vertical and it is
this that makes the fringes curved. Please be assured It is not a poor flat!)
|
|
|
|
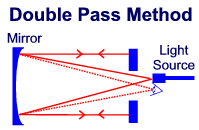
Double Pass Method: |
Testing accuracy can be doubled by using a double path method. This as its name implies, passes light off the mirror surface twice thereby
magnifying any faults. The point light source
is positioned closer to the mirror at the focal point. |
|
|
A large optical flat with a central hole reflects the light back down to the mirror for a second pass. The optical flat should ideally be as big as the
mirror under test. |
|
|
 |
|
 |
|
|
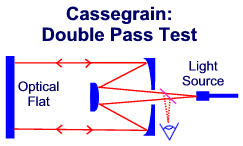
Note: Cassegrains do not usually have parabolic mirrors, but the Double Pass method can be used irrespective of the individual conic sections
used on the primary and secondary mirrors.
|
|
|
The two mirrors used in Cassegrain systems may be initially tested as separate entities although it is standard practice to carry out a Double Pass
test of both components together.
The point light source position on axis is often more critical, due to the longer effective focal lengths involved, and a beam splitter may be used to view the image formed. An optical flat at least as big as the primary mirror is essential to test Cassegrain systems.
A slight disadvantage appears to be that the centre of the primary mirror cannot be tested by double pass because of the hole in the optical flat. |
|
|
However a Newtonian has an elliptical flat and a Cassegrain has a secondary mirror that obscures the central area of the primary in use. So there is not really any disadvantage.
Testing of a large Newtonian or Cassegrain system by double pass is quite easy for the amateur if he/she has access to an optical flat of the same size as the primary mirror.
However optical flats are actually a lot harder and more expensive to make than a parabolic mirror of the same diameter. As a result, - there are very few optical flats of over 20" diameter in the UK today.
|
|
|
|
Testing at home: |
| There is a fairly simple test you can do to test your optics. This test is applicable for all types of telescopes, reflectors, refractors or even binoculars. |
|
|
Set up your telescope to view a star. Make sure the star is close to the centre of the field of view. Find the best focus position and then rock the focus backwards and forwards through
this point. At the best focus, the star should be a small point of light, but as the focus is moved, the star
will expand into a disc. |
|
|
| The enlargement should be even and the disc should be evenly lit throughout with no brighter rings or centre forming within the disc as the focus changes. The intensity will fade as the
disc gets larger. The disc should be circular at all times. Any deviation from these conditions indicates a problem. |
|
|
 |
| Good focus |
|
|
 |
| Astigmatism |
|
|
 |
| Different focus |
|
|
|
|
Good focus: |
If this is the view you get when you rock backwards and forwards through focus with a low power eyepiece then congratulations! There is nothing much wrong with your telescope!
If you use a high power eyepiece, you may see a fixed ring appear round the central pinpoint just on focus.
This is the first Airy Ring. If you can see this, it is yet another good indication there is nothing wrong with the telescope. |
|
|
|
Astigmatism: |
If one or more bright rings are forming and disappearing as focus is rocked, or there is a ring that appears to move, then this indicates a problem
with the mirror/lens correction.
Certain zones of the mirror have slightly differing focal lengths. |
|
|
|
Different focus: |
If the image changes shape as the focus is rocked, especially close to focus, this indicates astigmatism in the system.
First check the lens, mirror and the elliptical flat is/are not clamped too tightly in their cells before blaming the optics. |
|
|
| Over-tight clamping of the optics is often the cause of Astigmatism being seen by this test. If a mirror or lens really has astigmatism, then it can usually be proved by rotating that element, which will move the astigmatism by the same amount. |
|
|
|
Please don't adjust the optics yourself: |
| If you are getting views that suggest you might have a problem, please try a different eyepiece before blaming the optics. |
|
|
| If you are getting a good result from a star in the centre of view and you have a Cassegrain or Schmidt-Cassegrain, then repeat the test with a star towards the edge of the field of view. A Cassegrain or Schmidt-Cassegrain Telescope with Ritchey Chretien correction should give the same good result. If the view does deteriorate significantly, it indicates poor correction of the mirror and/or corrector plate combination. |
|
|
With a Newtonian telescope, the view will theoretically deteriorate as the star moves towards the edge of the field of view. This is due to the aberration known as coma and cannot be avoided in a pure Newtonian. The effect will worsen with faster focal ratios. But watch out! If you are
using a eyepiece without a wide angle capability, then astigmatism in the eyepiece may be far more of a problem! |
|
|
| A final note: - If you are not clear yourself what you are seeing - then get a more experienced person to look through the telescope with you. |
|
|
| Source: Oldham mirrors |
|
|
|
|
| |